

Esther: I've wanted a streak of blue hair for quite awhile. Problem? Bethany already has blue hair, and I couldn't possibly copy her, right?
Wrong.
See, it depends on why one wants blue hair. If you want it to be different, unique, and myopic then sure, the wilder, crazier and more different the better. But what if you just really like the color blue? We share a blog, why not hair color (really though, she's should share more than just the blue, since she has about eight times more hair than I do. Not fair.)
So couple Saturdays ago the dads took the sprite babies (and kid) to the park, and we commenced operation blue hair.

Bethany: Ever since I was a kid watching and reading vintage Superman with my dad, I dreamed of having an awesome patch of blue hair. For someone who much prefers to fade into the background at parties, my taste has an annoying habit of being anything but inconspicuous. So while like many people I prefer to not follow the latest trend, I must admit that I do like it when the latest trend conveniently coincides with my taste. When fluffy froufy skirts are in, I can wear them without drawing attention! When leggings and armwarmers are the rage, I can buy them anywhere and not feel like a freak! Now if only beautifully bright shades of hair would go mainstream....

Every step counts, though, so I was excited when Esther brought up the idea of adding a streak of color to her lovely curls.
I did a ton of research before dying my hair the first time, and I decided I was comfortable with the idea of possible damage since my hair was very very short then, but here's the requisite caveat that if you value the quality of your hair and have a distinct idea of what results you prefer, professional is probably the way to go.
That being said, here's my somewhat haphazard and wholly unprofessional method of bleaching virgin hair for the purpose of dying it a bright, extraordinary color.
Ingredients:
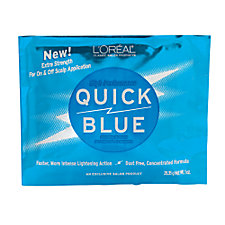
Bleach (surprise surprise!)
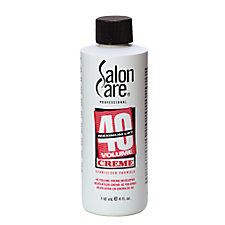
Developer (this and the bleach are from Sally Beauty)
Gloves
Bowl (not metal)
Foil/plastic wrap/wax paper

Test runs are always recommended. You can snip off a bit of hair and try the bleach out on it ahead of time to get an idea of the amount of time needed for the right effect.
Esther: Being the impatient person I am, I opted out of the whole test run thing. I already had a good idea of how my hair reacts to bleach from past skirmishes with my natural hair color.
Bethany: Don't close yourself up in a bathroom to do this... no inhaling the bleach!

Step one: Mix bleach and a tiny bit of developer in the bowl (although I bought a fancy plastic bowl at Sally's, I usually forget about it and use an old yogurt container), adding developer until it reaches desired consistency (I usually stop when it feels like gritty whipped cream). Very carefully avoiding all skin and hair closest to the scalp, spread mixture on chosen section of product-free dry hair, working it in with gloved fingers. I then use the foil, plastic wrap, or wax paper to keep the bleach from any contact with skin (believe me, it will burn) while the bleach works its magic.
Step two: Wait. The amount of time you need, like the kind of developer, depends a lot on your hair type. If you have darker hair like Esther and I do, you'll probably also need 40 volume developer and a full fifty minutes of bleaching, or even possibly two rounds (proceed at own risk). For lighter hair, lower volume developer is recommended as well as shorter time in the bleach mixture.
Hair basically comes in a range of dark to light, and the bleach takes the color out of the hair through that range step by step, which means that taking the bleach out too early will result in hair that is a lighter shade of brown or possibly an orangey yellow (which doesn't mix well with colors, haha). Leaving it in too long can result in damage, though, so it's good to keep tabs on the process. Colors like blue basically won't show up on darker hair, and mixed with yellower hair will turn green, so bleach is definitely recommended before bright dyes.
If you want the roots of your hair bleached too, add the mixture to them about 10 minutes before the rest of the hair is done, being careful to not actually touch the scalp. Even in dark hair, roots bleach white fast.
After the time is up, rinse out the bleach with gloved hands and shampoo lightly. Towel dry, and if the streak is light enough, you're ready to dye it.
Esther: I'd just like to insert here that I knew none of this. Reading this now makes me realize I probably would have burned my hair entirely off. Ahem
Bethany:

We completely forgot to take a between image, so here's what it looked like the first time I bleached streaks into my hair. As you can see, some parts ended up lighter than others, but it was overall lifted enough to work with the blue dye.
Tune in next time for the rest of the tutorial and to find out if I fried my hair into frizzy straw. Also opinions and reviews on the dye since everyone knows not all dye is created equal (who am I kidding. I had no idea dye wasn't just...dye, but now I know.)


April 28, 2010 at 6:32 PM
There are also some types of dye specifically created for use on dark hair- I dye my hair bright red, and didn't bleach the color out first. I do have to maintain it a LOT, but it's less harmful to my hair than bleaching (supposedly). I think Revlon makes the dye that I use, and I get it at my local beauty supply store (which seems better stocked and to have more knowledgeable, helpful employees than my neighborhood Sally Beauty Supply.) ;-)
April 28, 2010 at 8:00 PM
That sounds super.... there are a lot of options for more natural colors like red. Yours looks fabulous! My research is about three years old, so I'm definitely looking around to see if better vivid blues are available now! Sadly not with Revlon... Maybe if enough of us demand blue, it'll be supplied. :)
Post a Comment